In my spare time I started exploring game programming. I have tried HTML5 Canvas, kineticjs for few days and switched to Pygame for no reason!!!!.There are lot of similarity between kineticjs and Pygame.
So its easy to switch between both. Pygame is nice framework, if you are interested in writing small 2D kind of games, it's simple and easy to learn. Useing this we can create desktop and android related games.
So its easy to switch between both. Pygame is nice framework, if you are interested in writing small 2D kind of games, it's simple and easy to learn. Useing this we can create desktop and android related games.
Below tutorial gives you basic idea about usage of pygame framework.
If you want to port your existing game to Android platform, You can have a look of this page. Pygame for Android Pygame for Android
Programming knowledge skills of python and Some text editor of your choice.
Style guide for Python code. http://www.python.org/dev/peps/pep-0008/
1.Drawing game characters or images
2.Giving life to game characters
When I say giving life to characters, its making your character move, jump, run or hide. Technically speaking all these motions are just Illusions achieved with programming :D
For programmering perspective this is the core heart of the game or this is the basic alrogitham for game.
ie.
Step 0: Its all starts form here !!!.!!.!!
        Run pre-required things, Enter game loop
Step 1: While user does not exit:
Step 0: Run Artificial integience related to game
Step 1: Get the user input
Step 2: Update the game state
Step 3: Re-Draw display area
Step 2: Happy ending !!!..!!!..!!
Once we learn basic building block of Pygmae we will create game by following these Steps.
First step in creating game is creating visible window. This is like canvas for painting.
If canvas is available we can put our own thoughts and draw different characters.
Note:Code which runs in while loop is to keep the window open until you kill it. We will learn this Event mechanism later.
Note:Code which runs in while loop is to keep the window open until you kill it. We will learn this Event mechanism later.
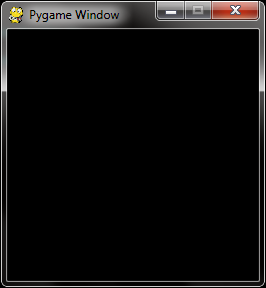
import pygame

#Initilaizing all pygame imported module
pygame.init()

#creating the canvas to draw the image for
#visible portion of the screen
#This function will create a display Surface.
window=pygame.display.set_mode((250,250))

pygame.display.set_caption("Pygame Window")
run=True
while run:
 for event in pygame.event.get():
  if event.type ==pygame.QUIT:
   run=False
This is the second step. Createing surface and drawing on window. In pygame all drawable objects are Surfaces
Ex: Image, Font, etc. Surface needs dimension (x,y) to create. Dimension is measured from left top position.
Surface.fill((R,G,B)) adds RGB color to surface window.blit(SURFACE,(POS)) writes Surface on the window at given position.
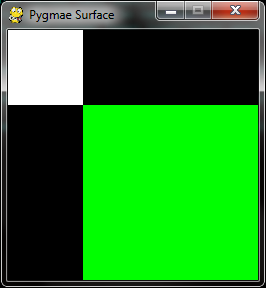
import pygame

#Initilaizing all pygame imported module
pygame.init()

#creating the canvas to draw the image for
#visible portion of the screen
#This function will create a display Surface.
window=pygame.display.set_mode((250,250))

pygame.display.set_caption("Pygmae Surface")

#visible image is Surface
one_surface=pygame.Surface((75,75))
two_surface=pygame.Surface((200,200))

#Fill color to surface
one_surface.fill((255,255,255)) #white
two_surface.fill((0,255,0)) #white

#Blitting surface in to window
window.blit(one_surface,(0,0))
window.blit(two_surface,(75,75))

#Updating display surface
pygame.display.update()

run=True
while run:
 for event in pygame.event.get():
  if event.type ==pygame.QUIT:
   run=False
pygame.draw API provides you basic necessary shapes which we need. This API is self explanatory, these takes start_pos,end_pos, radius or width to draw the shapes. Most of the these functions takes width argument which is by default 0. This decides how to draw edge of the shape. If width is 0 treated as solid fill. Below example show how to draw circle, line, rectangle, eclipse and polygon.
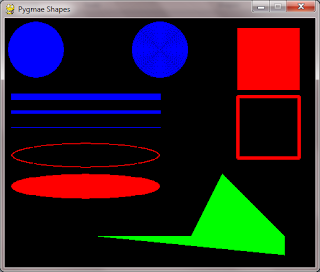
import pygame

pygame.init() #Initilaizing all pygame imported module
#creating the canvas to draw the image for visible portion of the screen
window=pygame.display.set_mode((500,400))

pygame.display.set_caption("Pygmae Shapes")

# set up the colors
WHITE = (255, 255, 255)
RED = (255, 0, 0)
GREEN = (0, 255, 0)
BLUE = (0, 0, 255)

#visible image is Surface
windowSurface=pygame.Surface((500,400))

#Blitting surface no window
window.blit(windowSurface,(0,0))

# draw a blue circle onto the surface with pos (300,50) radious 20
pygame.draw.circle(windowSurface, BLUE, (50, 50), 45, 0)
pygame.draw.circle(windowSurface, BLUE, (250, 50), 45, 45)#width is equal to radious

# draw some blue lines onto the surface with start and end point
pygame.draw.line(windowSurface, BLUE, (10, 125), (250, 125), 10)
pygame.draw.line(windowSurface, BLUE, (10, 150), (250, 150), 5)
pygame.draw.line(windowSurface, BLUE, (10, 175), (250, 175), 1)

# draw a red ellipse onto the surface
pygame.draw.ellipse(windowSurface, RED, (10, 200, 240, 40), 1)
pygame.draw.ellipse(windowSurface, RED, (10, 250, 240, 40), 0)

# draw the text's background rectangle onto the surface
pygame.draw.rect(windowSurface, RED, (375,15,100,100))
pygame.draw.rect(windowSurface, RED, (375,125,100,100),5)

# draw a green polygon onto the surface
# pointlist are define in anti-clockwise direction
pygame.draw.polygon(windowSurface, GREEN, ((150, 350), (450, 380), (450, 350), (350, 250), (300, 350)))

window.blit(windowSurface,(0,0))
#window.blit(windowSurface,(100,100))
#Updating display surface
pygame.display.update()


run=True
while run:
 for event in pygame.event.get():
   if event.type ==pygame.QUIT:
    run=False
pygame.image.load() function is used to load the image object as pygame Surface. Then we can blit(draw)on destination pygame Surface with destination position. Destination position is measured from top left corner on destination surface. Here I am using Gizmoduck image for demonstration purpose.
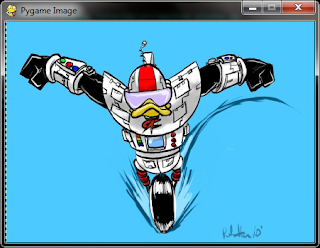
import pygame
import time

#Initilaizing all pygame imported modules
pygame.init()
#creating canvas to draw image for visible portion of the screen
#My Image size is 435x311 create display window of same size
window=pygame.display.set_mode((435,311))

pygame.display.set_caption("Pygame Image")

surface_image=pygame.image.load("gizmoduck.png")
window.blit(surface_image,(0,0))

#Updating display surface
pygame.display.update()

run=True
while run:
 for event in pygame.event.get():
  if event.type ==pygame.QUIT:
   run=False
Blitting(Drawing) method in pygame takes an argument which decides, which portion of the image
needs to be draw. Its an rectangle postion measured as left,top,width and height.
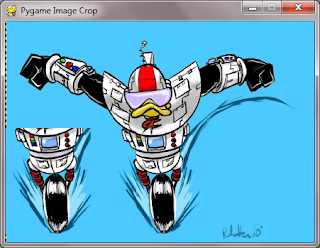
import pygame

#Initilaizing all pygame imported modules
pygame.init()
#creating canvas to draw image for visible portion of the screen
#My Image size is 435x311 create display window of same size
window=pygame.display.set_mode((435,311))

pygame.display.set_caption("Pygame Image Crop")

surface_image=pygame.image.load("gizmoduck.png")
window.blit(surface_image,(0,0))

#Part of the image
window.blit(surface_image,(0,150),(150,150,120,150))

#Updating display surface
pygame.display.update()

run=True
while run:
 for event in pygame.event.get():
  if event.type ==pygame.QUIT:
   run=False
To have control on image size we can use pygame.transform module. It operates on pygame Surfaces objects.
Here we are fitting our image which is 435 X 311 size to half the size ie 217 X 155 size.
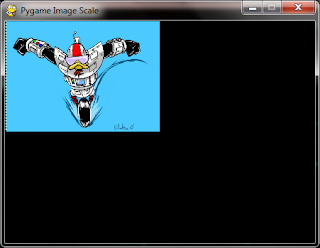
import pygame

#Initilaizing all pygame imported modules
pygame.init()
#creating canvas to draw image for visible portion of the screen
#My Image size is 435x311 create display window of same size
window=pygame.display.set_mode((435,311))

pygame.display.set_caption("Pygame Image Scale")

#load image and display in 217x155 space
surface_image=pygame.image.load("gizmoduck.png")
surface_image=pygame.transform.scale(surface_image,(217,155))
window.blit(surface_image,(0,0))


#Updating display surface
pygame.display.update()

run=True
while run:
 for event in pygame.event.get():
  if event.type ==pygame.QUIT:
   run=False
Color is a combination of RED,GREEN,BLUE color. We can choose the right value for these and create our own color
combination.
colorName = (r,g,b)
(r,g,b) is a tuple with values for RED, GREEN and BLUE. All three should be integers between 0 and 255, with 255 being brightest and 0 being darkest
colorName = (r,g,b)
(r,g,b) is a tuple with values for RED, GREEN and BLUE. All three should be integers between 0 and 255, with 255 being brightest and 0 being darkest
Examples:
 red = (255,0,0)
 green = (0,255,0)
 blue = (0,0,255)
 darkBlue = (0,0,128)
 white = (255,255,255)
 black = (0,0,0)
 pink = (255,200,200)
Below link gives you more information of color in programming.
http://www.tayloredmktg.com/rgb/
http://www.w3schools.com/html/html_colors.asp
font.Font modules is used to created Font object. This funtion takes font_file and size as parameter.
Font(font_filename, size) -> Font
Font(None, size) -> Font
Font(font_filename, size) -> Font
Font(None, size) -> Font
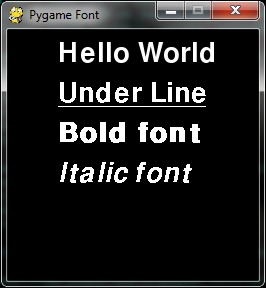
import pygame

#Initilaizing all pygame imported module
pygame.init()
#creating the canvas to draw the image for
#visible portion of the screen
#This function will create a display Surface.
window=pygame.display.set_mode((250,250))

pygame.display.set_caption("Pygame Font")
WHITE=(255,255,255)

#Create font object and render text from it
my_font= pygame.font.Font(None,40)
surface=my_font.render("Hello World",1,WHITE)
my_font.set_underline(1)
under_line=my_font.render("Under Line",0,WHITE)
my_font.set_underline(0)
my_font.set_bold(1)
bold=my_font.render("Bold font",0,WHITE)
my_font.set_underline(0)
my_font.set_bold(0)
my_font.set_italic(1)
italic=my_font.render("Italic font",0,WHITE)

window.blit(surface,(50,10))
window.blit(under_line,(50,50))
window.blit(bold,(50,90))
window.blit(italic,(50,130))

pygame.display.update()

run=True
while run:
 for event in pygame.event.get():
   if event.type ==pygame.QUIT:
    run=False
pygame.mixer is the API for loading and playing sounds.
We can do lot of things with this like play, stop, increase, decrease volume and many more thing.
Look at pygame doc for more information.
sound = pygame.mixer.Sound(sound_file_name)
sound.play()
sound = pygame.mixer.Sound(sound_file_name)
sound.play()
Events are state change in system ,In pygame these are stored in event queue.
we can retrieve these and process later.These are some events in pygame
QUIT
ACTIVEEVENTKEYDOWN
KEYUP
MOUSEMOTION
MOUSEBUTTONUP
MOUSEBUTTONDOWN
JOYAXISMOTION
JOYBALLMOTION
JOYHATMOTION
JOYBUTTONUP
JOYBUTTONDOWN
VIDEORESIZE
VIDEOEXPOSE
USEREVENT
QUIT
ACTIVEEVENTKEYDOWN
KEYUP
MOUSEMOTION
MOUSEBUTTONUP
MOUSEBUTTONDOWN
JOYAXISMOTION
JOYBALLMOTION
JOYHATMOTION
JOYBUTTONUP
JOYBUTTONDOWN
VIDEORESIZE
VIDEOEXPOSE
USEREVENT
No game can survive with out having using mouse motions, With mouse motion, we can control our game characters. Below sample code shows basic usage of mouse event,right click, left click, mouse down and mouse up action.
How to run:
Click on the window using mouse and check the print out at std_out(command_line)
import pygame

run = 1
screen = pygame.display.set_mode((250,250))
pygame.display.set_caption("Pygame Mouse")

while run:
    event = pygame.event.poll()
    pos = pygame.mouse.get_pos()
    if event.type == pygame.QUIT:
        run = 0
    elif event.type == pygame.MOUSEMOTION:
        print "mouse at (%d, %d)" % event.pos
    elif event.type == pygame.MOUSEBUTTONDOWN and event.button == 1:
        print "Left_Click at pos=(%d, %d)" %pos
    elif event.type == pygame.MOUSEBUTTONDOWN and event.button == 3:
       print "Right_Click at pos=(%d, %d)" %pos
    if event.type == pygame.MOUSEBUTTONDOWN:
         print "Mouse Button up"
    if event.type == pygame.MOUSEBUTTONUP:
         print "Mouse Button down"
Below is the code to show how to read keyboard event from pygame.
How to run:
        Click on the window using mouse and check the print out at std_out(command_line)
How to run:
        Click on the window using mouse and check the print out at std_out(command_line)
import pygame

running = 1
screen = pygame.display.set_mode((250,250))
pygame.display.set_caption("Pygame Keyboard")

while running:
    event = pygame.event.poll()
    if event.type == pygame.QUIT:
        running = 0
    if event.type == pygame.KEYDOWN:
 inkey=event.key
 if inkey <= 127:
     print "Key down char",inkey,":",chr(inkey)
Data structures are the way to handle the data in some pre-defined order. In out game case we need some way to handle our
game characters (Sprites)
What is sprite?
In modern world Sprite = Image + rectangle.
when to use sprite?
when we have visible game characters we can use Sprite for convience. Its simple light weighted class, we can extend this and create our own game characters for easy handling.
Main advantage of using Sprite is, its a container object for pygame data structures, So we can deal with lot of game characters in more efficient way.
Basic building block:
    Surface.image
    Surface.rect
Optional but power full:
    Group(We will see what is Group later)
import pygame

#Initilaizing all pygame imported modules
pygame.init()
#creating the canvas to draw the image for visible portion of the screen
#My Image size is 250x250 so I am creating display window of same size
window=pygame.display.set_mode((250,250))
pygame.display.set_caption("Pygmae Sprite Tutorial")

my_sprite= pygame.sprite.Sprite() # create sprite

#Sprite=Image+Rect
my_sprite.image=pygame.image.load("Ducktalesmoney.jpg")
my_sprite.rect=my_sprite.image.get_rect()

window.blit(my_sprite.image,my_sprite.rect)

#Updating display surface
pygame.display.update()

run=True
while run:
 for event in pygame.event.get():
   if event.type ==pygame.QUIT:
    run=False
This is the container class for pygame Sprite. It is handy when we want to do similar operation on group of pygame Sprites.
ie if we want to move, rotate or scale multiple pygame Sprite at once. All pygame Sprite have draw method we can which will be called by Group.draw() method.
If we are not interested in the order of Sprite stored in container class and the order in which Sprites are drawn we can can go for Group.
One think to remember here, Group does not guarantee over order of pygame Sprite. If we need some kind of order then OrderedUpdates ????(Add link here) are the right choice. Which stores pygame Sprites in the order of addition to the container class.
Below are the list of methods available in Group class.
sprites    : List of the Sprites this Group contains
copy       : Duplicate the Group
add        : Add Sprites to this Group
remove   : Remove Sprites from the Group
has       : Test if a Group contains Sprites
update  : Call the update method on contained Sprites
draw      : Blit the Sprite images
clear      : Draw a background over the Sprites
empty    : Remove all Sprites
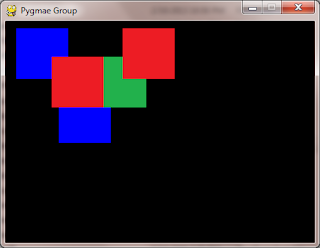
Below program is written using object oriented concept of python.
Here i have used Red,Green,Blue png image to show the usage of Group.
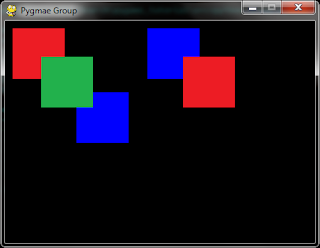
import pygame

class my_sprite(pygame.sprite.Sprite):
 def __init__(self,pos_x,pos_y,image_name):
  #Caling base calss ctor to initialize container class
  pygame.sprite.Sprite.__init__(self)
  self.image= pygame.image.load(image_name)
  self.rect=self.image.get_rect()
  self.rect.x=pos_x
  self.rect.y=pos_y
  self.dis=5

class Game:
 def __init__(self):
  pygame.init()
  pygame.display.set_caption("Pygmae Group")
  self.window=pygame.display.set_mode((435,311))
  self.back_surface=pygame.Surface((435,311))
  self.my_group=pygame.sprite.Group()
  #self.my_group=pygame.sprite.OrderedUpdates()
  my_sprite.containers=self.my_group

 def main(self):
  self.my_group.add(my_sprite(10,10,"red.png"))
  self.my_group.add(my_sprite(50,50,"green.png"))
  self.my_group.add(my_sprite(100,100,"blue.png"))

  self.my_group.add(my_sprite(200,10,"blue.png"))
  self.my_group.add(my_sprite(250,50,"red.png"))

  #Draw all the sprites at one shot
  self.my_group.draw(self.window)
  pygame.display.update()
  run=True
  while run:
   for event in pygame.event.get():
    if event.type ==pygame.QUIT:
     run=False


if __name__=='__main__':
 game=Game()
 game.main()
To move game characters is again a illusion. It involves below steps.
   1. Move the existing Sprite to new location
      Change its rect position
   2. Clear the old blitted postion
   3. Re-Draw the Sprtie
In the above Group example change my_sprite class and game loop method ie main() method as below.
   1. Move the existing Sprite to new location
      Change its rect position
   2. Clear the old blitted postion
   3. Re-Draw the Sprtie
In the above Group example change my_sprite class and game loop method ie main() method as below.
class my_sprite(pygame.sprite.Sprite): def __init__(self,pos_x,pos_y,image_name): pygame.sprite.Sprite.__init__(self) self.image= pygame.image.load(image_name) self.rect=self.image.get_rect() self.rect.x=pos_x self.rect.y=pos_y self.dis=5 def update(self): print "here" if self.rect.x >435: self.dis=-5 elif self.rect.x <0: data-blogger-escaped-pre="" data-blogger-escaped-self.dis="5" data-blogger-escaped-self.rect.x="self.rect.x+self.dis">while run: #logic to clear are update all sprite self.my_group.clear(self.window,self.back_surface) #This will call all the sprite update method self.my_group.update() self.my_group.draw(self.window) pygame.display.update() #new for event in pygame.event.get(): if event.type ==pygame.QUIT: run=FalseLayers Layers: Layers are mainly designed like how our human eye see the object when then are in order. We see First object (Nearest object) first, second object( Second nearest object) behind First object same for third object and so on. After experimenting with sample code you will get idea about layers.
Layers are like OrderedUpdates which maintains the order of pygame Sprite blit(draw). Along with this it give Sprite a layered approach. By default all Sprites added to layer are in default(layer=0) layer.
We can change these layer using methods specified.add: Add a sprite or sequence of sprites to a group sprites: returns a ordered list of sprites (first back, last top) draw: draw all sprites in the right order onto the passed surface get_sprites_at: returns a list with all sprites at that position get_sprite: returns the sprite at the index idx from the groups sprites remove_sprites_of_layer: removes all sprites from a layer and returns them as a list layers: returns a list of layers defined (unique), sorted from botton up change_layer: changes the layer of the sprite get_layer_of_sprite: returns the layer that sprite is currently in get_top_layer: returns the top layer get_bottom_layer: returns the bottom layer move_to_front: brings the sprite to front layer move_to_back: moves the sprite to the bottom layer get_top_sprite: returns the topmost sprite get_sprites_from_layer: returns all sprites from a layer, ordered by how they where added switch_layer: switches the sprites from layer1 to layer2Below example show the layered approach for Sprites. Its little complex if you are new to layering concept. Click on image to change its layer and experiment with sample code to understand layering concept.

import pygame class my_sprite(pygame.sprite.Sprite): def __init__(self,pos_x,pos_y,image_name): pygame.sprite.Sprite.__init__(self) self.image_name=image_name self.image= pygame.image.load(image_name) self.rect=self.image.get_rect() self.rect.x=pos_x self.rect.y=pos_y class Game: def __init__(self): pygame.init() self.window=pygame.display.set_mode((435,311)) pygame.display.set_caption("Pygmae Group Tutorial") self.my_layer1=pygame.sprite.LayeredUpdates() def main(self): self.my_layer1.add(my_sprite(10,40,"red.png")) self.my_layer1.add(my_sprite(30,60,"blue.png")) self.my_layer1.add(my_sprite(60,80,"green.png")) my_font= pygame.font.Font(None,25) my_font.set_underline(1) surface=my_font.render("Click of image to chane its layer",1,(255,255,255))#White self.window.blit(surface,(10,10)) self.my_layer1.draw(self.window) pygame.display.update() run=True while run: pos_y=100 for event in pygame.event.get(): pos = pygame.mouse.get_pos() if event.type ==pygame.QUIT: run=False if event.type == pygame.MOUSEBUTTONDOWN and event.button == 1: pygame.draw.rect(self.window, (0,0,0), (150,100,300,300),0) for sprite in self.my_layer1: if sprite.rect.collidepoint(pos): layer=self.my_layer1.get_layer_of_sprite(sprite) if layer <=3: layer=layer+1 else: layer=0 self.my_layer1.change_layer(sprite,layer) my_font= pygame.font.Font(None,25) string="layer:"+str(self.my_layer1.get_layer_of_sprite(sprite))+" Image_name:"+sprite.image_name surface=my_font.render(""+string,1,(255,255,255))#White self.window.blit(surface,(150,pos_y)) pos_y=pos_y+50 self.my_layer1.draw(self.window) pygame.display.update() if __name__=='__main__': game=Game() game.main()
No comments:
Post a Comment